To backup your QuickBooks Desktop:
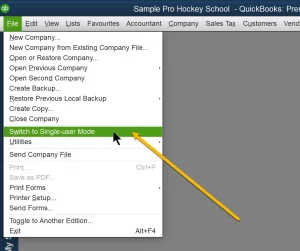
- Go to the File menu in QuickBooks and select Switch to Single-user Mode (Figure A1).
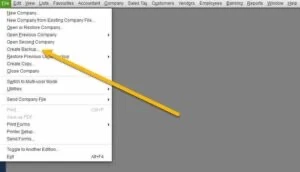
- Go to the File menu again and hover over Back up Company (Figure A2).
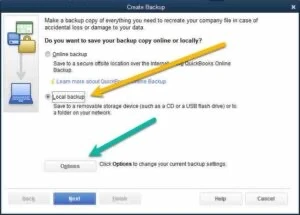
- Select Create Local Backup then select Local Backup and then Options (Figure A3).
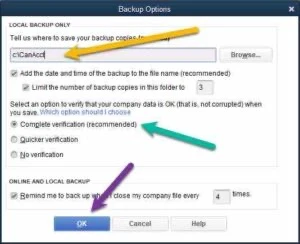
- In the Local Backup Only section, (Figure A4), select Browse and select where you want to save your backup company file. We suggest you save to your Desktop so that that .qbb backup can easily be found. Then set the number of backups you want to keep. This is optional. When you’re ready, select OK.

- Select the Next button (Figure A5).
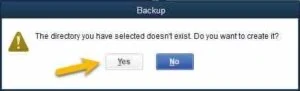
- If the directory you want to save your backup does not exist you will be asked to create it, (Figure A6).
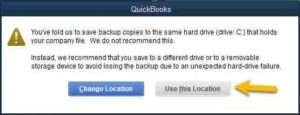
- If you have selected to back up your Quickbooks to the same drive as your Quickbooks Data, you will be shown a warning window (Figure A7).

- QuickBooks will first verify your Quickbooks Data Integrity (Figure A8).
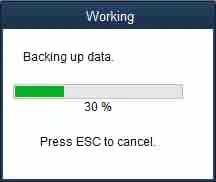
- The QuickBooks process will then continue (Figure A9).
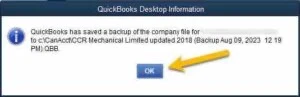
- Once the QuickBooks Backup process is complete, you will be notified (Figure A10).
The remaining step is to upload the QuickBooks Data Backup (.qbb file) to our office. Continue by selecting:
Uploaded your Accounting Software Backup to our office. The instructions are for clients who have an active engagement with our firm.
(New Client): If you are a new client who has not signed an engagement with our firm, please first continue with:
(Existing Clients): For clients who have an active engagement (having signed a prior engagement), note that the first instruction will open the upload page in a new window or browser tab, however, you can refer to this page for the remaining instructions. Continue with:
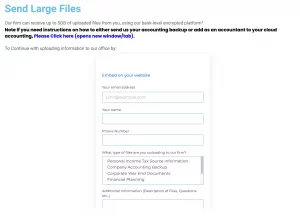
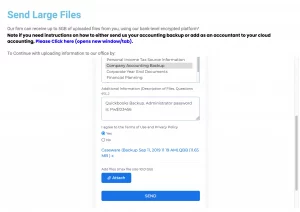
- On the Upload web page/ tab (Figure B1), complete your:
- E-Mail Address
- Your Name
- Your Mobile Phone Number
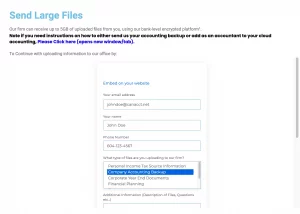
Scroll down in the upload section (Figure B2) (to show the attach and send buttons) to:
-
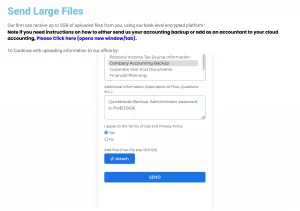
- Provide a brief description of the Accounting Backup, including the year-end date, as well as providing the Administrator password (if applicable), (Figure B3).
- Agree to the Terms of Use and Privacy Policy (Figure B3).
- Click the Attach button and Browser to the location of the Accounting Backup file (Figure B3). The backup files end with the following:
- .qbb = Quickbooks Backup file.
- .cab = Sage Backup File.
-
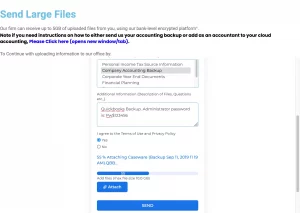
- Do not leave the page or close the browser tab, as your file will now attach with you being shown a progress bar (note B4).
-
- Once the Accounting Software File is attached, then continue by clicking the Send button (Figure B5).
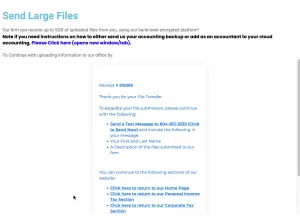
- IMPORTANT: Once the submission is completed (Figure B6), please note the Submission Receipt Number (#516285 in the above Figure B5). Also, continue by notifying our office by e-mail. Please complete either of the following:
Please note that once you submit your Accounting Backup to our firm, we will be able to return the source data file to you as we utilize the latest accountant software version. Instead, our firm will provide you with adjusting entries and can even arrange to enter these adjusting entries remotely.

1.Navigate to the Manage Users Menu

- From the home screen, click on the Gear Menu, (Figure C1).
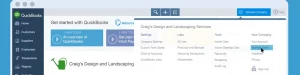
- Then continue with selecting “Your Company” select the Manage Users tab (Figure C2).
2. Open Invitation
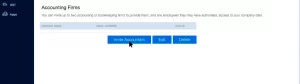
- On the Manage Users page, click Invite Accountant to open a new invitation (Figure C3).
3.Enter Your Dedicated Accountant’s Name and Email

- Enter your dedicated accountant’s name and email address into the text boxes and click Next when you’ve finished, (Figure C4).
- If you are unsure of who your dedicated accountant is, Click here and our office will provide the dedicated accountant’s name and e-mail address.
4. Finalize Invitation

- Click Finish and you’re done. Your accountant will get an email with a link to your QuickBooks, (Figure C5).
4. Notify our Office.
- Click here to notify our office that you have added your dedicated accountant to your QuickBooks Online.
- From there, it’s up to your accountant to log in and start working on your books.